
Jekyll Warning: Using the last argument as keyword parameters is deprecated
업데이트:
Warning: Using the last argument as keyword parameters is deprecated
- bunlde exec jekyll [serve/build] 등의 명령어를 사용해본 사람들 중 해당 메시지가 Console창에 끝도없이 출력되는 모습을 본 적이 있을 것이다.
- 모든 사람들이 이 문구를 보고 파악한 가장 큰 문제는 deprecated된 keyword parameters로, 무언가의 상하위 호환에 대한 오류인 점을 알 수 있을 것이다.
- 하지만 정확히 이 지긋지긋한 메시지를 제거하기 위한 명확한 가이드라인을 검색해서 찾아 해결하기 상당히 귀찮을 것이다. 해서, 이 불필요한 로그를 제거하는 방법을 공유하고자 한다.
Ruby version
- 루비는 처음부터 2.7을 사용하였고, 시작부터 해당 이슈가 있었기에 근본 문제부터 찾아보기로 한다.
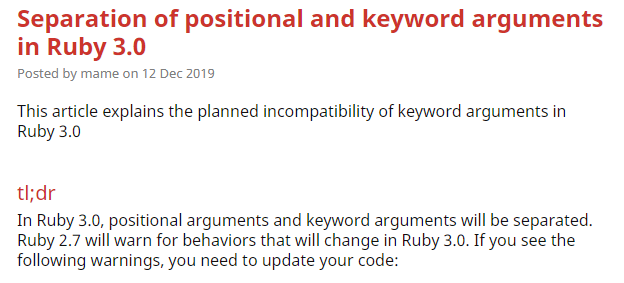
- 위의 문제는 손쉽게 위의 사진에 표시된 내용임 확인 할 수 있었다.(링크로 본문이 연결된다.)
- 주요 내용은 “Ruby 3.0 이후에서는 위치 인수와 키워드 인수가 분리되므로 2.7 버전에서는 이에 대한 경고를 하여 코드를 수정해야 한다.”는 내용이다.
- 해결 방법 1안은 루비 버전을 내려서 메시지가 출력되지 않게 하는 방법이 있을 것이다.
- 해결 방법 2안은 사용하는 버전의 Plugin등을 사용하는 방법이 있을 것이다.
- 1안은 미래 지향적으로 좋은 방법은 아닐 것으로 판단하고 2안으로 탐색하고 진행하였다.
Plugin version
- Jekyll 버전은 3.6.2를 고정으로 사용했으나, 3.x 버전이 다 해당 문제가 발생함을 확인하였다.

- 결국 Jekyll을 4.x로 올리는 방향을 고민하였지만, 역시나 여기에도 위의 함정이 있었다.(링크로 본문이 연결된다.)
Github Pages?
- Github Pages는 Github 저장소에 Commit한 내용을 웹사이트로 자동으로 만들어 주는 서비스이다.
- 그럼 이 Github Pages를 사용하지 않으면 블로그 운영이 불가능한 할까? 물론 아니다.
- 하지만 이 문제는 Github Actions를 통해 해결이 가능한 문제임을 댓글들을 읽다보면 확인 가능하다.
Github Actions?
- Github Actions는 Software의 Workflow를 자동화 및 커스터마이징하여 CI/CD 등의 원하는 작업을 직접 구현할 수 있는 도구를 제공하는 서비스를 말한다.
- 그럼 Github Pages를 통해 자동화 서비스를 받던 부분을 Github Actions로 구현하면 되는 부분이다.
Github Actions - workflow.yml
- Github Actions의 중심 파일은 workflow.yml 파일이다.
# This is the name of our workflow.
# Github will show it on its Website UI
name: deploy
# This configures our workflow to be triggered
# only when we push to the master branch
on:
  push:
    branches:
      - master

# Here is where we define our jobs.
# Which means the tasks we want Github to execute
jobs:
  build:
    name: deploy
    # Here we specify in whith OS we want it to run
    runs-on: ubuntu-18.04
    # Now we define which actions will take place.
    # One after another
    steps:
      # This is the first action. It will make sure that we have
      # all the necessary files from our repo, including our custom actions
      # This action here is actually from a remote repo available from Githup itself
      - uses: actions/checkout@v2
      # This is our custom action. Here is where we will define our git commands
      # to push our website updates to the `gh-pages` branch.
      # Notice that we are specifying the path to the action here.
      # We will create those files in a sec
      - uses: ./.github/actions/build-dist-site
        env:
          # Now make sure you add this environment variable.
          # This token will allow us to push to github directly
          # without having to type in our password.
          # The GITHUB_TOKEN is available by default
          GITHUB_TOKEN: $
          GITHUB_REPOSITORY: $
          GITHUB_ACTOR: $
- 이 파일은 /.github/workflows/ 폴더 내에 존재해야 자동으로 인식한다.
- secrets.GITHUB_TOKEN, secrets.GITHUB_REPOSITORY, secrets.GITHUB_ACTOR는 workflow 진행 시, 자동으로 제공되는 환경변수이다.
Github Actions - actions
- workflow의 jobs.build.steps.uses 항목을 보면 알 수 있듯이 workflow에 대한 actions를 정의해야 한다.
- actions는 action.yml, Dockerfile, entrypoint.sh 세 가지로 구성하였다.
- Docker 기반이 아닌 Node.js 기반 등 다양한 환경의 actions가 제공이 되므로, 위의 내용을 보기 위해서는 Github -> Repository -> Actions에서 확인 가능하므로 참고바란다.
Github Actions - actions.yml
- actions.yml 파일은 새 사이트 버전을 빌드하기 위한 행위를 설정한다.
- 물론 위에서 설명하였듯이 Docker 기반으로 빌드를 진행하도록 하였다.
 # Ok, here the keys are pretty much self explanatory :)
name: 'Deploy new version'
description: 'Setup Ruby env and build new site version'
author: 'GracefulSoul'
runs:
  using: 'docker'
  image: 'Dockerfile'
Github Actions - Dockerfile
- Docker 기반으로 빌드하기 위한 기본 Dockerfile이다.
- 기본으로 ruby:2-slim image 기반으로 구성한다.
- 마지막으로 ENTRYPOINT를 이용하여 shell file을 Docker가 실행되면 자동으로 수행하도록 해준다.
# Our Docker image will be based on ruby:2-slim
# it is a very light docker image.
FROM ruby:2-slim
LABEL author="GracefulSoul"
LABEL version="1.0.0"

# Lets install all dependencies
# including git and Bundler 2.1.4
ENV BUNDLER_VERSION 2.1.4
RUN apt-get update && \
  apt-get install --no-install-recommends -y \
  bats \
  build-essential \
  ca-certificates \
  curl \
  libffi6 \
  make \
  shellcheck \
  libffi6 \
  git-all \
  && gem install bundler:2.1.4 \
  && bundle config --global silence_root_warning 1

# This is our entrypoint to our custom scripts
# more about that in a sec
COPY entrypoint.sh /

# Use the entrypoint.sh file as the container entrypoint
# when Github executes our Docker container
ENTRYPOINT ["sh", "/entrypoint.sh"]
Github Actions - entrypoint.sh
- 초기 환경 변수를 선언한 부분이 이 부분에서 자동으로 Repository를 clone하여 build를 수행한다.
- 사용자 구성에 따라서 “Jekyll build done” 이후 blog project가 생성되는 폴더의 위치로 이동시켜주면 된다.
#!/bin/bash
# Exit immediately if a pipeline returns a non-zero status.
set -e

echo "🚀 Starting deployment action"

# Here we are using the variables
# - GITHUB_ACTOR: It is already made available for us by Github. It is the username of whom triggered the action
# - GITHUB_TOKEN: That one was intentionally injected by us in our workflow file.
# Creating the repository URL in this way will allow us to `git push` without providing a password
# All thanks to the GITHUB_TOKEN that will grant us access to the repository
REMOTE_REPO="https://${GITHUB_ACTOR}:${GITHUB_TOKEN}@github.com/${GITHUB_REPOSITORY}.git"

# We need to clone the repo here.
# Remember, our Docker container is practically pristine at this point
git clone $REMOTE_REPO repo
cd repo

# Install all of our dependencies inside the container
# based on the git repository Gemfile
echo "⚡️ Installing project dependencies..."
bundle install

# Build the website using Jekyll
echo "🏋️ Building website..."
JEKYLL_ENV=production
bundle exec jekyll build
echo "Jekyll build done"

# Now lets go to the generated folder by Jekyll
# and perform everything else from there
cd ../posts

echo "☁️ Publishing website"

# We don't need the README.md file on this branch
rm -f README.md

# Now we init a new git repository inside _site
# So we can perform a commit
git init
git config user.name "${GITHUB_ACTOR}"
git config user.email "${GITHUB_ACTOR}@users.noreply.github.com"
git add .
# That will create a nice commit message with something like:
# Github Actions - Fri Sep 6 12:32:22 UTC 2019
git commit -m "Github Actions - $(date)"
echo "Build branch ready to go. Pushing to Github..."
# Force push this update to our gh-pages
git push --force $REMOTE_REPO master:gh-pages
# Now everything is ready.
# Lets just be a good citizen and clean-up after ourselves
rm -fr .git
cd ..
rm -rf repo
echo "🎉 New version deployed 🎊"
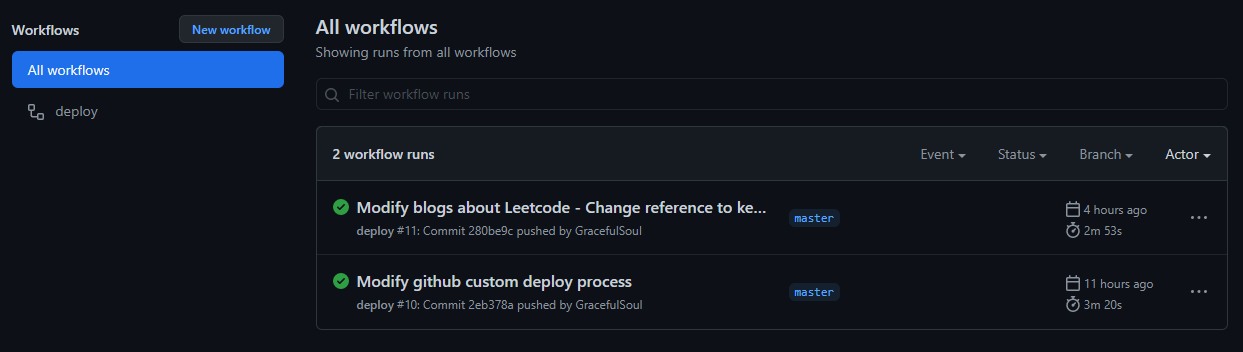
- 내용을 작성 후 git push까지 진행하게 되면, 위의 사진과 같이 자동으로 workflow가 수행되게 된다.
The end
- 만일 모르고 Ruby 2.7이 EoS(End of Service)되고 3.0으로 올렸을 경우, 큰 문제에 직면했을 가능성이 있다.
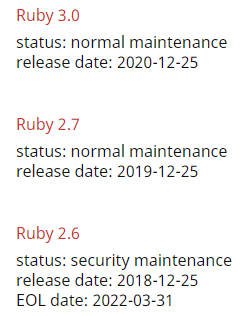
- 물론 위의 사진처럼 아직 확정되지 않았지만, Ruby를 사용하고 코딩하는 개발자로서 이는 기본으로 파악해야 할 내용이다.
- 모든 경고 메시지 안에는 추후 발생할 상황을 예측 할 수 있으며, 이를 회피하기 위해서 사전에 해결하는 것이 현명한 방법이다.
Reference
Sujay Kundu - github pages와 actions를 사용하여 쉽게 jekyll blog를 배포하기
댓글남기기